Thursday 31 July 2014

Rubber toe mould!

Well this was an eye opener... Attempting to cast my toes using RTV silicone from Polycraft. Earlier on I sculpted my toes with Sculpey and baked them in the oven. I have sprayed them and the mould tin with silicone release.


Mixed the 2 part silicone mix together, and poured into my mould tin. I suspended them by skewers and random equipment so that I was able to define how far from the bottom the toes sat. 


So open both kits and mix together thoroughly. Throw away the piece of junk wooden stir stick it comes with as it'll snap in no time. Mix til both become one colour. 


Sadly I then realised half of the silicone I bought wouldn't be enough. So had to break into the second half of the kit, oh now what should I do with the spare mixture ... Not enough to do the other toes... So....


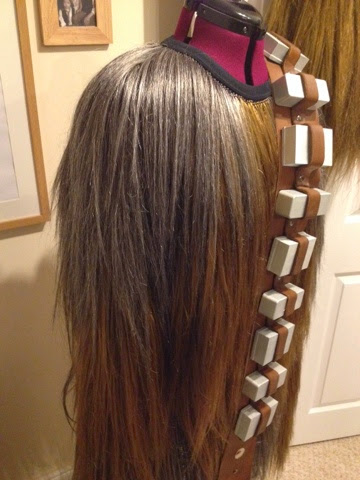
Time to make some bandolier box moulds!! If I can make these out of foam all the better eh! ;-)

Pattern changing the legs.

So he legs have had a little rework. This is phase 1... Adding more brown to the inner thigh/leg/crotch area


Makes it a little more of a patch on the legs rather than a constant colour. I'm going to work lots of brown into the silver areas randomly to make it a little less dense...


Tuesday 29 July 2014

Fancy foot work

So I'm waiting for my silicone to turn up so that I can cast my toes!

Mean whilst, a little stilt work.

Chopped a little of the sandal ends off to make my foot profile as small as possible


All taped up and no where to go!

This is always going to be the ugliest part of any build, but if done neatly it can hide the fact you are on stilts at all!

The trick is to eliminate the foot bump some Chewies have.. So you make your foot area as small as possible. On e the big ol' toes are attached and fur is hanging down these feet will look rally realistic... 

"They ain't much to look at kid , but I've made a lot of special modifications myself"

Monday 28 July 2014

Top re-adjustments done

Finally took a load of he silver grey off te sides and put more brown in...


About 4 inches lower now


And from the front


They jus start to creep in and will meet the trouser greys. Though they are Infact latched about 10+ inches above where we can see here...

Sunday 27 July 2014

Chewie suit modifications

So we realised after putting the suit on that there was too much silver/ grey in areas, and not enough in others!

Chewie couldn't make up his mind what style to go for!! 

So we've been removing grey from around the waist and adding it to the shoulders... More pics to follow


Thursday 17 July 2014

Chewie head!

So today I have purchased the last major part of he puzzle, Chewies head. Under skull, mask and teeth.

All purchased from Dougiefett (aka Evil Chimp)

Just check his work out!!


Bowcaster progress!

So speaking to Darren from Purgeworx props..

Bowcaster is coming along! It's going to have REAL scopes now too ;-)


AWRSOME!!!


Tuesday 15 July 2014

More shoulder adjustment..

So working on the other shoulder now... Taking out lots of brown to extend the grey down...later I will be giving it a bit of a dye spray to darken it down...


Monday 14 July 2014

Test fit again

So trimmed both stilts down and trialed with suit and new bandolier!

Check out Chewie now, gangstaaaaa!!

Shins still need a bit of padding. I don't have any feet/toes or hands yet but you can see decent progress!!


 Note : This is still before any trimming has been done! So happy with this shot, and its yet to be improved on the pattern around the waist, and slimmed down a tad.. this is going to be awesome!


 Note : Just by taking off an inch or so off the toes, there is much less of a foot bump and it looks SO much better than before! Once the padding and does are on his feet are going to look great!

Things to do : 

Bandolier needs attaching somehow!! It wants to slide off that furry shoulder! I am thinking about using snaps carefully attached to the inside of the mesh to allow it to be clamped on.

Lightweight stilts are a must!! Took off a lot of weight by taking my steel capped boots out and removing one of the pipe struts. I will wrap in tape, and fill with expanding foam so that they become a solid unit.

Sunday 6 July 2014

Bando-heeeeere!!

Oh yes! Chewies sexy underwear is here... They couldn't give him pants... But he does wear this!!


 Note : I realised at this point how HEAVY this Bando is.. going to have to sort that! Spoke to Paul Abernathy aka TrooperMaster (TM) about pulling me some hollow ABS boxes that i can spray and replace these with...
 Note : You can see here where the grey on the neck line is blended into the brown a bit better - at this point ive only done one side

Can't wait to get this finished now!!

Wednesday 2 July 2014

Changing the top fur pattern, almost like a boss..

So started trying to add more brown to the torso and more silver fox to the arms! This old dogs gettin' older by the minute!


More brown on the left hand mid torso area, this is stopping the sharp V shape I had until now on the front.


Then the grey I'm taking away I'm putting on the shoulders and vice versa..


Chewie you naughty rock star you! He's gonna get all the ladies!!

Awwwwh crap!

Well i guess this is why we have a blog! So that you guys can learn from my mistakes..

I will put a note in further back so if you read this in chronological order it will not be a mistake you make..

For some reason my suit colour pattern is not right! Dont know how we managed it, i think i was using an old reference pic that is really dark and showed a lot more dark fur


Check out some better pics :

He is much lighter around the legs and knees, i think he lost a lot of fur before the other pic was taken!


Ive also realised i need a lot more grey/silver around the shoulders..... so back to latching i go!!

The grey does not cover the whole leg, just the outsides of it.. and as i said before more grey to the tops...


Tuesday 1 July 2014

Bowcaster in the making!

A lovely man from Purgeworx Props is building me a bowcaster!! Check this bad boy out!!